For my sister's 24th birthday, I needed to make something youthful for the final year before she turns a quarter century. We grew up in Texas, so a piñata made sense though we've never had a piñata for our birthdays, we just wished we did. I had my first piñata for my 24th birthday in college. It was Dora the Explorer and it even talked. We took the excitement of the piñata a little too far by lopping Dora's head off and setting it on fire. Regardless of the disturbing behaviors piñatas seem to invoke in half-baked adults, I was determined to make one. Unfortunately, all my internet searches came up with lame how-to's on how to make a piñata out of a inflated balloon. I'm not trying to run arts and crafts hour at a mental institution.
So, I started from scratch. Figuring out how to make anything without the Internet may seem daunting, but I went to college so this was easy.
Materials
cardboard box
exacto-o knife
scissors
tape (doesn't matter which kind as long as it can hold cardboard together like masking tape or duct tape)
marker/pen
heavy string/twine
flour
water
newspaper
tissue paper or tradition Korean paper (3 pages of red and green)
black paper (enough to make the seeds - I used 6 little sheets of black origami paper)
glue sticks
candy
Get some cardboard to make the frame. Cardboard doesn't seem ideal because it doesn't shatter like you'd want a piñata to. But layering it with soggy pieces of paper mâché hardens it.
You'll only need three sides of the box. Where the box hinges where the sides meet is the top of the watermelon. The base (rind) of the watermelon if formed using the third side of the box so you're forming an isosceles triangle with two congruent sides (watermelon wedge).
 |
| Ignore the angles. |
When you lay the sides down flat, the "d" sides should form a kind of circle.
Next, you want to cut out pieces of the sides "d" so that the piñata will actually break when hit repeatedly. We've got kind of an orange slice/pizza design going which we first traced then used an exact-o knife to cut.
Fold the piñata over so that you have a stencil to cut out the other side. Then cut out the pieces you traced.
When you're done, you should have something resembling a giant orange slice.
The base needs to be trimmed down to eliminate the flaps hanging off the sides. Then fold and tape the bottom flap to the other side of the watermelon wedge.
Because the piñata needs to be hanged, poke two holes into the top and thread some heavy thread through. This step is really important. Otherwise, it's going to be a true bitch to try and hang your piñata.
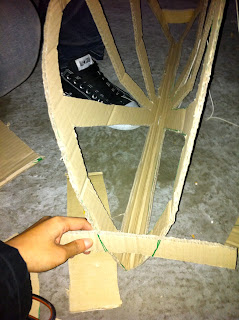
Because the sides are just giant gaps, some supports need to be put in place. Use the flaps you just cut off to make cardboard strips about an inch thick.
Hold these up to where you'll be taping them down.
Trim the cardboard slat.
Tape on.
And you have your frame!
Next, paper mâché. Get together a flour and water mixture about the consistency of runny pancake batter.
Shred newspaper into 1-inch strips, going with the "grain". Dip each strip into the batter and kind of squeegee the paste so that it's sufficiently soaked into the newspaper but not weighing it down. Don't soak batches of the strips in the paste because they'll just disintegrate.
For the first layer, I did the front and back of the wedge, and let it dry overnight by hanging it somewhere with newspaper underneath to catch any dripping paste. Then I paper mâchéd the bottom and one side. Then a few hours later when it dried, I did the other side and the bottom again. Whichever way you choose, the frame needs two to three layers of paper mâché.
I couldn't find tissue paper. I'm sure they sell it somewhere, but not at E-mart or Daiso. So I resorted to Korean traditional rice paper. I got 3 sheets of red and 3 sheets of green in Insadong for a little over 1,000 won per sheet. Cut the paper into 1-inch strips by loosely folding the paper several times and then cutting.
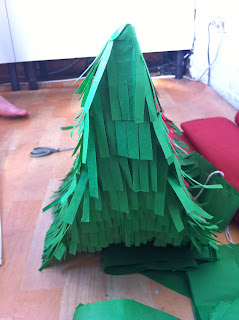
To create the fringe, keep the paper folded and cut the fringe by cutting thinly half-way up the paper.
Starting from the bottom, start gluing on the fringe to form the rind.
Then glue in the red fringe.
Cut out the seeds from black paper. Glue them all on and choose one to make a hole in to put in the candy. The reason you're gluing on the seed first is to know how big you can make the hole. You shouldn't need to make the hole very big unless you're stuffing your piñata full of apple pies. I used Mike and Ike's from Costco. After stuffing in your candy, glue another seed on top to hide the hole.
All this work (took me THREE DAYS) so that my little baby sister can smash it all to pieces because it's her birthday. That's love.


Thanks for the publish,its really informative.It always seems to me like piñatas should get used as effigies.
ReplyDeleteregards
Pinata